When talking bulletin boards, these things come to mind---fun, creative, bright, work, interactive, back to school, how much work I'm creating for myself....!! Or---how long can I leave this up before changing it?! :)
And as far as my classroom goes.....I don't have any room for bulletin boards. I have 2 boards that are your typical bulletin boards. I have a white board and then a shower board I use as a word wall, that my dad and I hung up.
We have an open classroom concept at my school, so we have to be very creative in how we hang up any back to school boards or student's work.
I'm going to take you through a few pictures of what I have in my classroom and what I've already completed for back to school for this year! I have been teaching summer school so I've been able to go ahead and get a few things done!
Are you ready??!! :)
First thing I decide on is what do I want my background to look like. I personally am not a fan of the butcher paper as a background. It tends to fade if I want to leave it up for long periods of time. So I LOVE using the plastic Dollar Tree tablecloths!!

They come in all colors...I always use black. It makes everything pop. I've been using the same black tablecloth on each one of these boards for probably 4-5 years.
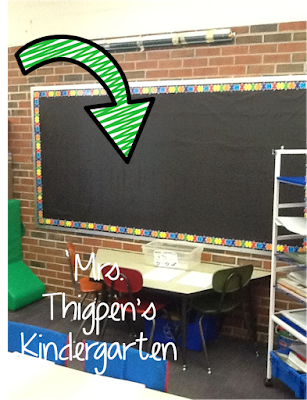

It does look a little wrinkled but I promise once you put stuff on it, you don't see the wrinkles. Make sure to get ALL of the air out and take your time when putting it up. Then you won't have so much of a problem with it.
Next I want to figure out what my board will be used for. These (above pics) are the ONLY bulletin boards I have in my classroom. So I need to make them very useful.
The pic with the blank board---every year changes. It might have a job chart and my station rotation charts. The other board is my student work board. It's been updated since this pic, it has numbers on each paperclip.
Now that these boards are figured out, the hard task is coming up. What do I put up for the beginning of the year. We have a wall that is hard to describe. I really am not sure what it's made of but you can put tacks in it and staple things.
So outside of my door I have a small board I created out of butcher paper (no tablecloths in the hallway---they wouldn't last 2 days!!) and border!

This is what I've put up for this year. I'm IN LOVE with the black border and blue paper!!! So cute and the black again just pops!!!!
Now with paper and border up, here comes the fun part!! What in the world do I put on there that can last for about a month or so?
So I did some Pinterest searching (who else is a constant Pinner????) and came up with some ideas!
We have Ellison die cuts at school but I wanted something different for my letters. So I created these on PowerPoint! I just made a black circle, added a text box, found a cute font, and bam---printed!!
It was so easy to cut out the circles.....

Then I drew an Ipad (it looks crooked in the pic but it's not!) HERE'S A TIP----Don't staple anything until you used Push Pins to put everything where you want it. It's so much easier to move things around, change it up and then staple once it's perfect!

Finished product!!! I love it!!

When you first come down the Kindergarten hallway, we've (the K teachers) have created a bulletin board so it's the first thing the kiddos and parents see. Again, we had to create it like the one above by my door.
For the past couple of years we have used Pete the Cat as our board, but this year we decided something a little different.
After searching again and tweeking some ideas we found, we came up with something that goes along with the big Minion craze this year.
I wanted a huge minion and then some smaller ones which would each represent a K teacher.
I grabbed some butcher paper and began drawing.

Once I had the big one put together, we created smaller versions. Again we played around with the wording (so we did NOT use staples to begin with---we pushed pinned everything until we had it the way we wanted it!) and we used Ellison die cuts for the letters.
Here's the final! Sorry for the horrible glare (and the little white strips of paper the minions are holding---they will have each K teacher's name on it!)

Once the boards by my room were completed, my teacher friend wanted to get a head start on hers. She found a cute idea for a tree using tissue paper!
We figured a hula hoop would make a great circle and paper bags would make a great trunk! Here are some pictures of the work!


We began putting up the parts of her bulletin board......she was going to finish it while I was gone on my mission trip this week so I haven't seen the final!
But here's what we had so far (the letters for the word EYE were changed....we ran out of the color letters we needed (this time we used punch out letters from the Dollar tree). But we needed to measure out the word so we put up what we had!


There you have it....just a few things I do for bulletin boards....remember our big trick----PUSH PINS first!!!! Then staple!!
Now head over to the linky to check out more about bulletin boards!